User Authentication in Next.js with Supabase
Intro
IMPORTANTThis article was written for Supabase v1, which is now outdated. Though everything still works (to the best of my knowledge), please be aware that the libraries and versions mentioned here are now outdated. See the ✨NEW✨ updated guide on using Supabase v2 and Next.js 13 instead.
Supabase has been getting a lot of attention in the tech community, and for good reason. This open source platform makes it super easy to get started building complex full-stack applications, and in this post we will take a look at how to utilize one of its core offerings: User Authentication.
Overview
One of the things that stands out about Supabase almost immediately is just how easy it is to get started. You can be up and running in quite literally minutes, and Authentication is no exception. It provides a fully integrated solution, including user management and email notifications, with no reliance on any external authentication services. And with Supabase being open source, you have complete control and ownership of your user data, as it's all stored in the same PostgreSQL database.
Supabase provides several different authentication mechanisms out of the box:
- Basic Email authentication
- Magic Link or a one-time login with email
- Social logins: Google, Facebook, GitHub, Azure, Gitlab, Twitter, Discord, and Bitbucket
- Phone / SMS login using Twilio integration
In this tutorial we'll be using Email authentication, with ability to reset forgotten password.
Just want the code? GitHub repo available here. Live version is available as well.
Supabase Client
Supabase provides a client library that makes it supa easy to get started in your project. It is a modular library, comprised of several different sub-libraries, each enabling integration with the specific sub-system:
@supabase/postgrest-jsfor PostgREST (REST API for PostgreSQL)@supabase/realtime-jsfor Realtime (realtime connection to PostgreSQL via websockets)@supabase/gotrue-jsfor GoTrue (fork of Netlify's authentication and user management API)
The single @supabase/supabase-js bundle combines the three libraries into one, and adds some ease-of-use enhancements, making it the perfect Supabase companion for your projects.
It's worthwhile to note that the client library is also available in several other different languages as well - including C#, Python, Rust and Dart.
Supabase UI
Supabase also provides an open source component library called Supabase UI, which is a collection of common UI components and utilities that are used across the range of Supabase products. Its styling is heavily inspired by Tailwind CSS, so you know it will look good out of the box.
 Supabase UI
We will be using the Auth component, which provides all the necessary screens and integrations for the various authentication flows. In particular, we'll need to be able to perform the following:
- Sign Up (Email)
- Sign In (Email)
- Sign Out
- Reset Password
- Update Password
As you can see, that's quite a bit of UI and state logic that we would need to implement ourselves from scratch. Using a component that provides all of that already wired up out of the box will be a big time saver.
In this tutorial, we'll take a look at everything you need to use this component in your own application, as well as some ways to customize it to your needs.
NOTE: At the time of writing this post, Supabase UI is in early development stages, so the API and some features may still change in the full release. For example, theming is not currently supported, and is the reason we'll need to perform some workarounds later on.
Supabase Setup
You will need to create a Supabase account if you haven't already done so. Supabase provides a generous free tier for their cloud solution, so it's easy to get started. Alternatively, since it's open-source, you can also host your own as well.
Once signed up, go to Supabase Dashboard and create a new project.
API Keys
In order to be able to access the Supabase API via our JS client, we will need to have API keys available in the app.
In the dashboard, go to Settings > API. As you'll see, by default an anonymous public API key is already available. This will be enough for our needs. Take note of this value, as well as the URL:
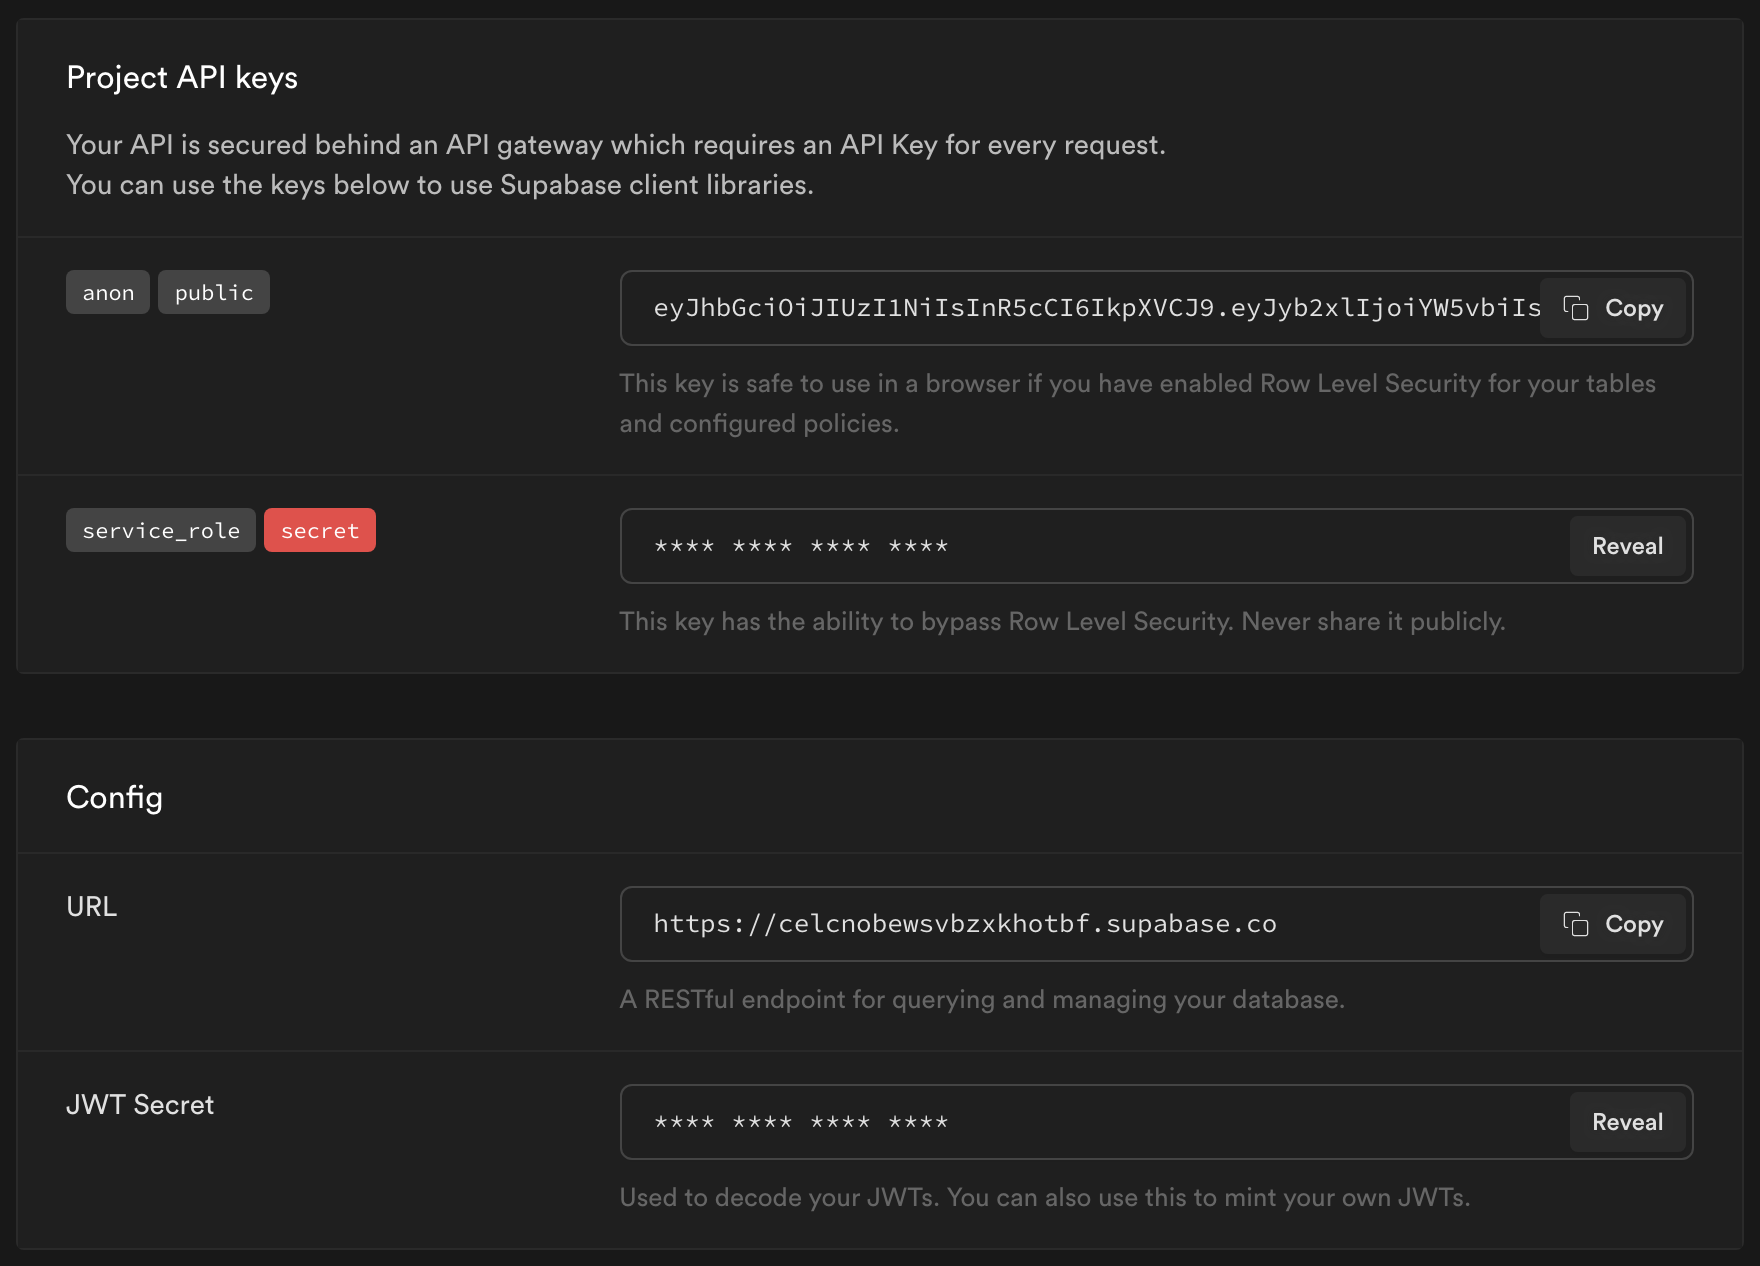 API Settings in Supabase Dashboard
Make sure to keep these on hand, as we'll need them later on.
Next.js Project Setup
For this tutorial, we'll be using Next.js and the Tailwind CSS starter template 🚀
To do that, run:
npx create-next-app --example with-tailwindcss next-with-supabase-authThen, install both Supabase Client, and Supabase UI dependencies:
npm install @supabase/supabase-js @supabase/uiThat's all we need to get started. Let's code!
Application Structure
Our application will be pretty simple. The main Home page will show the different authentication screens - Sign In, Sign Up, Forgot Password, etc. It wil also show the authentication status, a button linking to a Profile page, and a button to sign out.
The Profile page will display the currently logged-in user's data, and a button to go back to Home page. It also needs to be a "protected" page, meaning that only authenticated users can access it. We'll take a look at how to accomplish this both on client and server-side in later steps.
First, let's scaffold out the base pages.
Home Page
Let's go ahead and put some placeholder content on the main page to start with:
import Layout from '@/components/Layout';

export default function Home() {
  return (
    <Layout>
      <h2>Welcome!</h2>
      <code className="highlight">You are logged out</code>
    </Layout>
  );
}
Profile Page
Similarly, let's put some placeholder content on the Profile page:
import Link from 'next/link';

import Layout from '@/components/Layout';

export default function Profile() {
  return (
    <Layout>
      <h2>User Profile</h2>
      <div className="heading">Last Signed In:</div>
      <code className="highlight">N/A</code>
      <Link href="/">
        <a className="button">Go Home</a>
      </Link>
    </Layout>
  );
}
Where Layout is our main layout container, abstracted into a component in components/Layout.js:
import Head from 'next/head';

export default function Layout({ children }) {
  return (
    <div className="flex min-h-screen flex-col items-center justify-center py-2">
      <Head>
        <title>Next.js with Supabase Auth</title>
        <link rel="icon" href="/favicon.ico" />
      </Head>

      <main className="flex w-full flex-1 flex-col items-center justify-center px-8 text-center sm:px-20">
        <h1 className="text-5xl font-bold sm:text-6xl">
          Next.js with <span className="font-black text-green-400">Supabase</span>
        </h1>
        <div className="mt-8 inline-flex w-full max-w-sm flex-col space-y-8">
          {children}
        </div>
      </main>
    </div>
  );
}
TIP: Enable absolute import paths and module aliases in Next.js for shorter imports, like
@/componentsetc.
We've also abstracted some CSS classes that will be used throughout the app in the styles/globals.css file (using Tailwind):
@tailwind base;
@tailwind components;
@tailwind utilities;

@layer base {
  h2 {
    @apply py-4 text-4xl font-black text-gray-800;
  }

  .button {
    @apply custom-focus rounded-full border-2 border-green-400 bg-white px-8 py-2 font-bold text-green-400 hover:bg-green-400 hover:text-white focus:bg-green-400 focus:text-white;
  }

  .button-inverse {
    @apply custom-focus rounded-full border-2 border-white bg-green-400 px-8 py-2 font-bold text-white hover:border-green-400 hover:bg-white hover:text-green-400 focus:border-green-400 focus:bg-white focus:text-green-400;
  }

  .custom-focus {
    @apply focus:border-green-400 focus:outline-none focus:ring-2 focus:ring-green-400 focus:ring-offset-2;
  }

  .heading {
    @apply text-lg font-semibold text-gray-700;
  }

  .highlight {
    @apply ml-1 rounded-lg bg-gray-100 p-2 font-mono;
  }
}
Adding Authentication
With the base of our project scaffolded out, we can start working on the authentication layer.
Initializing Supabase
Supabase Client lets us easily work with the Supabase API, and manages our authentication and user data on the front-end. In order to initialize it, we will need to specify the URL and the public API key from the previous step.
We can do this by setting those values as environment variables in Next.js. Create a .env.local file in the root of the project, and set the values to the ones from the dashboard earlier:
NEXT_PUBLIC_SUPABASE_URL=<value>
NEXT_PUBLIC_SUPABASE_ANON_KEY=<value>
Next, let's create a separate file for our Supabase Client instance. Name this file client.js and put it in lib folder at the root of the project:
import { createClient } from '@supabase/supabase-js';

export const supabase = createClient(
  process.env.NEXT_PUBLIC_SUPABASE_URL,
  process.env.NEXT_PUBLIC_SUPABASE_ANON_KEY,
);
Now whenever we need to use Supabase Client, we can simply import it and access the available functionality.
Authentication Provider
In order to handle all the authentication logic in our app, we're going to use the concept of an authenticaion provider. This pattern was heavily inspired by Kent C. Dodds blog post on this topic, and follows a lot of the same basic principles.
We'll call this AuthProvider and use it as the top-level component in our app, thereby providing user data and authentication functionality throughout. It will utilize React Context, and provide the session and user objects from Supabase Client, as well as the signOut function. The rest of the authentication flows will be handled by the Auth component from Supabase UI, which we'll get to in later steps.
Inside the lib folder, create a file auth.js, and add the following:
import { createContext, useContext, useEffect, useState } from 'react';

export const AuthContext = createContext();

export const AuthProvider = ({ supabase, ...props }) => {
  const [session, setSession] = useState(null);
  const [user, setUser] = useState(null);

  const value = useMemo(() => {
    return {
      session,
      user,
      signOut: () => supabase.auth.signOut(),
    };
  }, [session, user, supabase]);

  return <AuthContext.Provider value={value} {...props} />;
};

export const useAuth = () => {
  const context = useContext(AuthContext);
  if (context === undefined) {
    throw new Error('useAuth must be used within an AuthProvider');
  }
  return context;
};
Here, we have the main AuthProvider, which we'll need to wrap our application in. It provides the user and session values, as well as exposes the signOut function from Supabase Client. To access these values in our app pages, we've also created the useAuth hook, which simply pulls the values from the AuthContext.
Now before we can use it, we need to make AuthProvider the top-level component of our application. We'll do this by adding the following to pages/_app.js:
import { AuthProvider } from '@/lib/auth';
import { supabase } from '@/lib/client';

// ...

function MyApp({ Component, pageProps }) {
  return (
    <AuthProvider supabase={supabase}>
      <Component {...pageProps} />
    </AuthProvider>
  );
}
Where supabase is our Supabase Client instance. Now we can freely use the useAuth hook in our app and access the session and user objects.
Getting User Data
Let's update the Home page to utilize some of the user data, and add a few more UI elements for the authenticated state. We'll add a link to the Profile page, and a button to log out the current user (by calling the signOut function). We'll also display the user's role as a badge. Feel free to get more creative here 😄
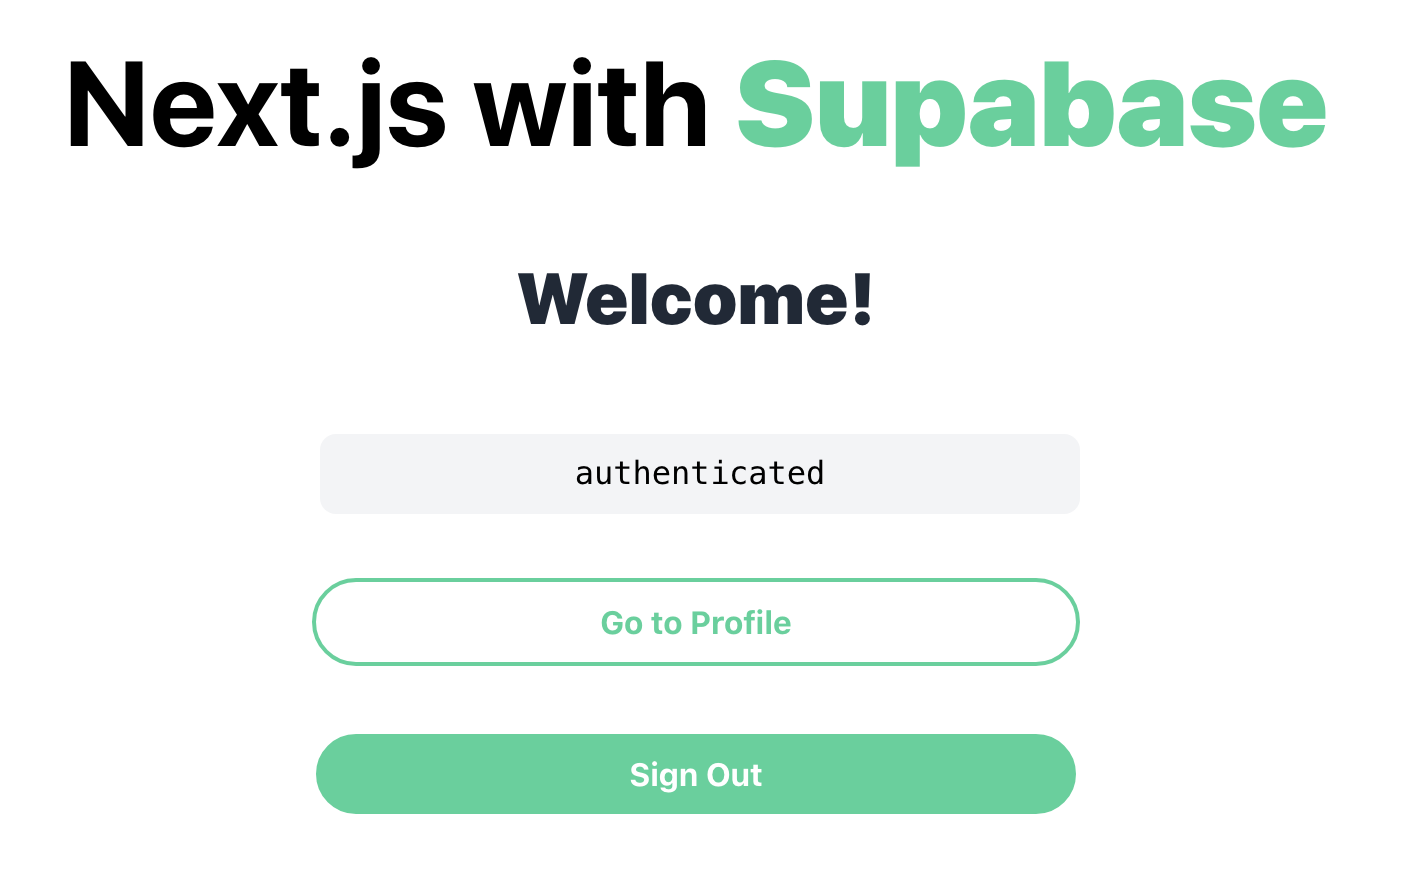 Home Page
import { useAuth } from '@/lib/auth';

export default function Home() {
  const { user, signOut } = useAuth();

  // ...

  return (
    <Layout>
      {user && (
        <>
          <h2>Welcome!</h2>
          <code className="highlight">{user.role}</code>
          <Link className="button" href="/profile">
            Go to Profile
          </Link>
          <button type="button" className="button-inverse" onClick={signOut}>
            Sign Out
          </button>
        </>
      )}
    </Layout>
  );
}
Adding Supabase UI
As mentioned earlier, we will need to support the following auth flows: Sign Up, Sign In, Sign Out, Reset Password, Update Password.
Normally this would take quite a bit of time to build from scratch - we'd need to create several different forms, add input validation, error handling, state and UI logic, etc. As you can see, the list gets rather long rather quickly.
Supabase makes this easy for us to do as well. Using the Auth component from Supabase UI, we can add all of these required screens to our app with fairly minimal effort, with the aforementioned functionality already included.
To do this, we'll use the Auth component on the main landing page, and pass it our Supabase Client instance. In pages/index.js, add:
import { Auth } from '@supabase/ui';
import { supabase } from '@/lib/client';
// ...
return (
// ...
{!user && <Auth supabaseClient={supabase} />}
// ...
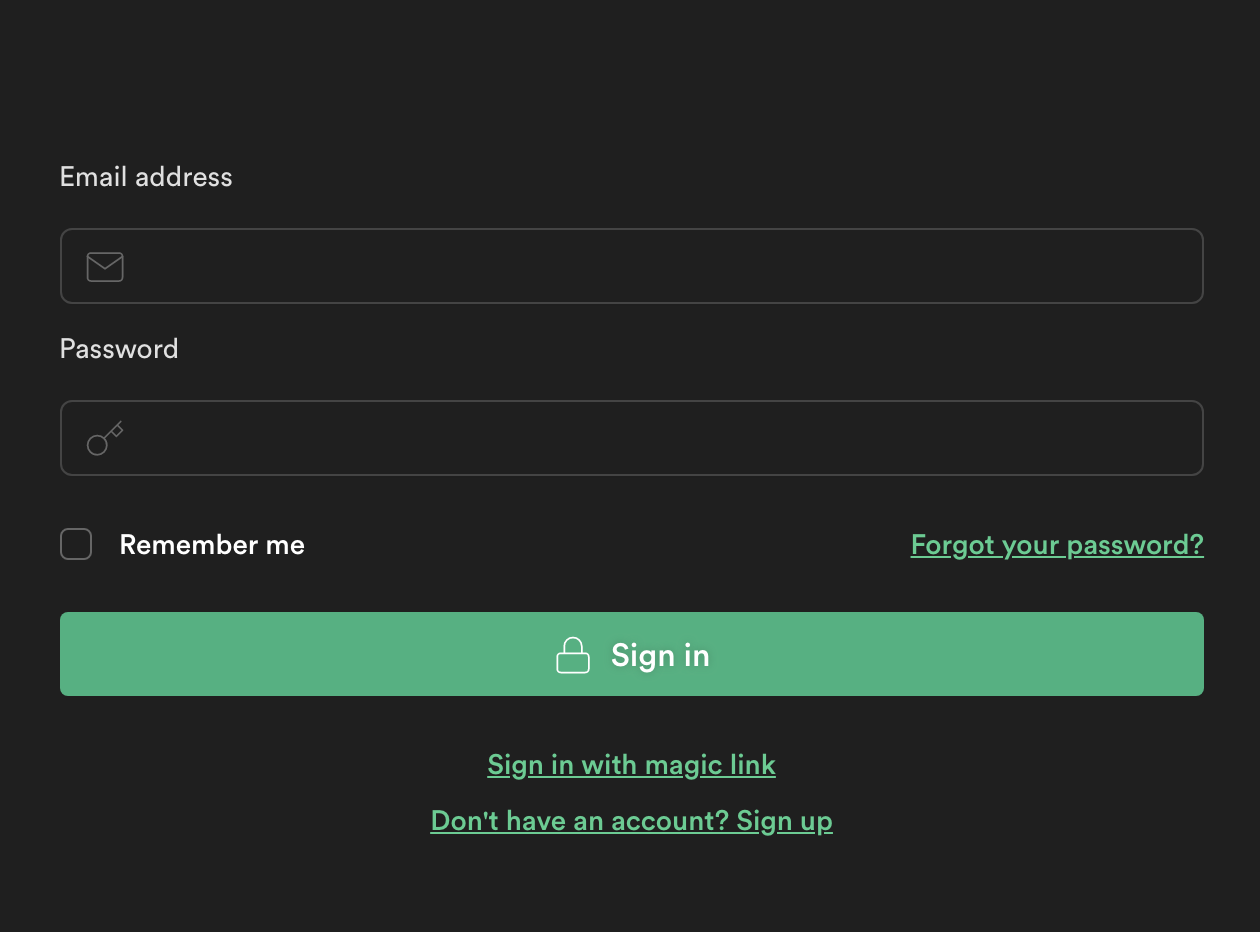
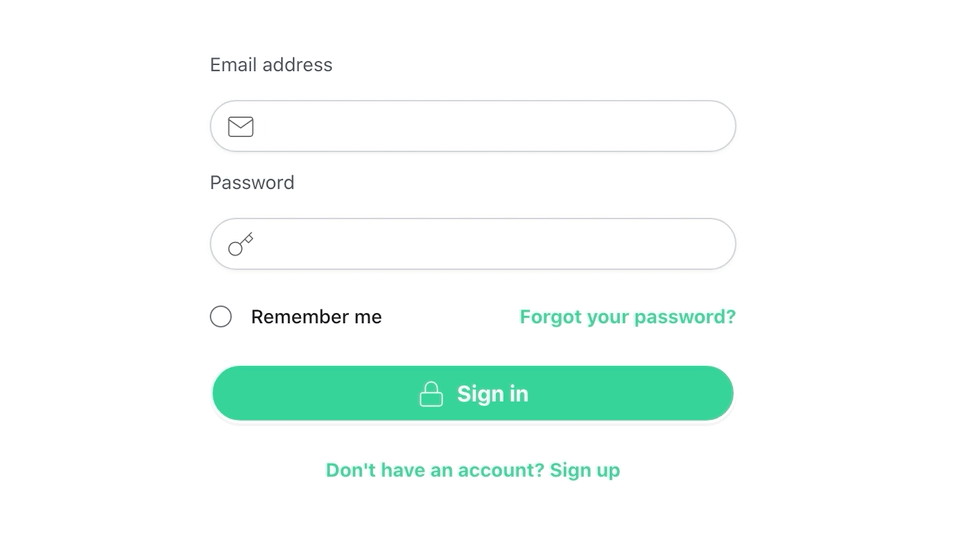
);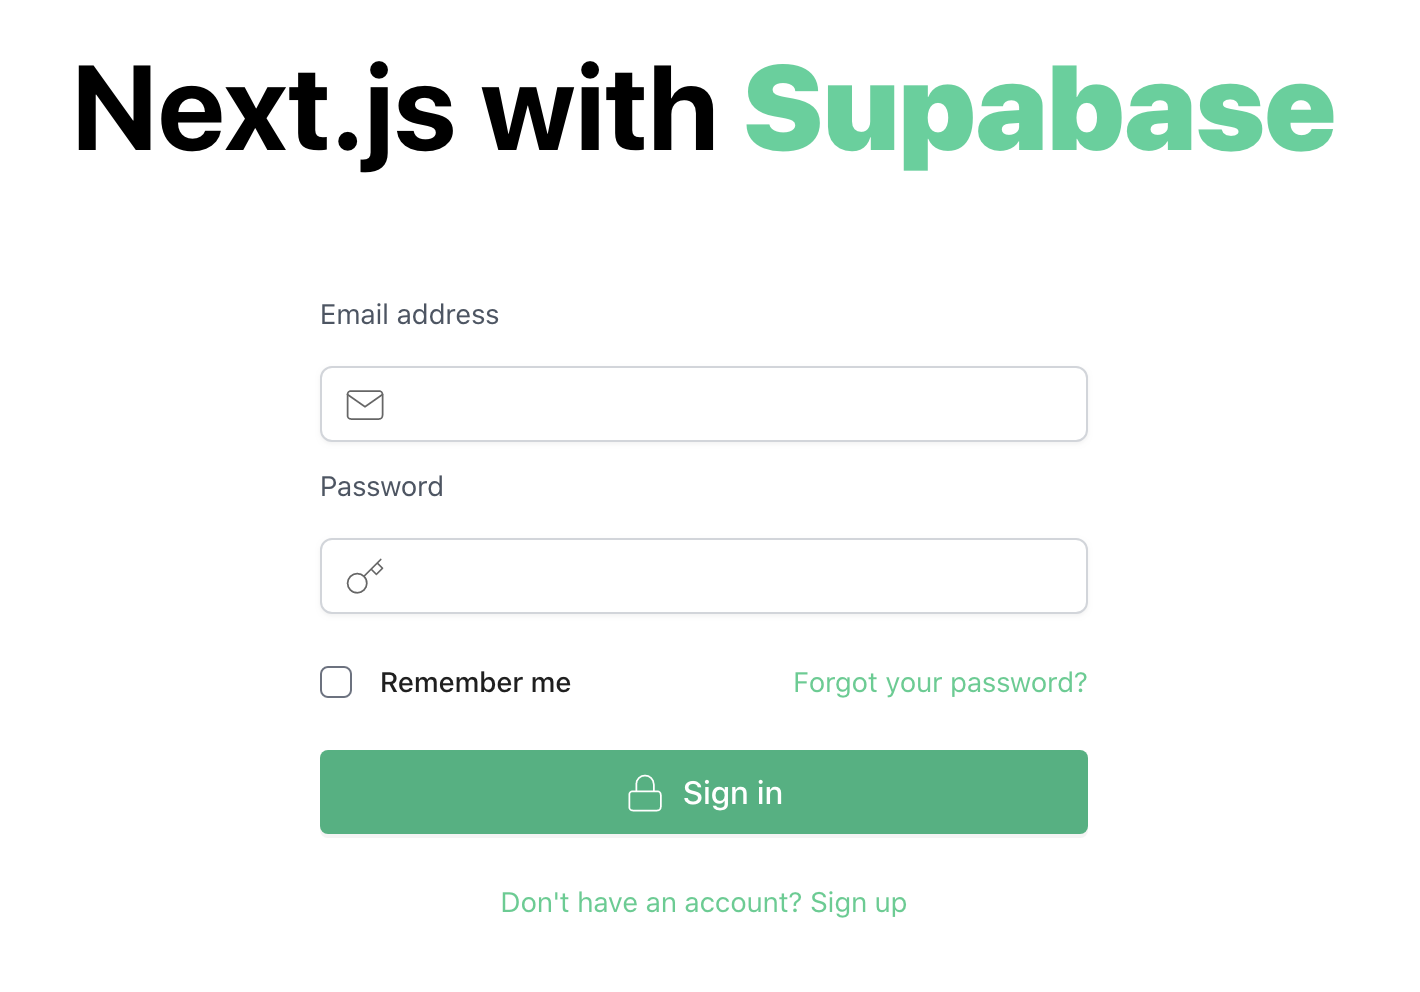 Sign In
We pass our Supabase Client instance to it via the supabaseClient prop, and voila! 🎉 Now we have a shiny new UI, with all of the required forms to handle the login flows. However, before we can fully test this, we'll need to setup a few more things.
Handling Auth State Change
What happens if the authenticated state changes in Supabase Client? For example, when a user successfully logs in, or the current user signs out? Our application will need to know about these changes in the state. Which means that we also need a way to update our user and session data whenever this happens. We can do this by adding an event listener on the onAuthStateChange method in Supabase Client.
Back in our lib/auth.js file, create authListener for the onAuthStateChange event inside a useEffect hook (on initial load):
useEffect(() => {
  const activeSession = supabase.auth.session();
  setSession(activeSession);
  setUser(activeSession?.user ?? null);

  const { data: authListener } = supabase.auth.onAuthStateChange(
    (event, currentSession) => {
      setSession(currentSession);
      setUser(currentSession?.user ?? null);
    },
  );

  return () => {
    authListener?.unsubscribe();
  };
}, []);
Now whenever auth state in Supabase Client changes, our user and session state objects will be updated as well, and this data will be in sync with Supabase Client.
Switching Auth Views
We need a way to tell the Auth component which screen to show as a result of the auth state change. For example - when a user signs out, we want our Auth component to show the Sign In screen again. We can do this by passing view prop to the Auth component, which tells it which authentication flow to show. The event received by onAuthStateChanged will dictate which view we should be showing. We'll see how this gets utilized for updating a user's password in a later step.
First, let's store all the possible values for both the VIEWS and EVENTS in lib/auth.js:
export const EVENTS = {
  PASSWORD_RECOVERY: 'PASSWORD_RECOVERY',
  SIGNED_OUT: 'SIGNED_OUT',
  USER_UPDATED: 'USER_UPDATED',
};

export const VIEWS = {
  SIGN_IN: 'sign_in',
  SIGN_UP: 'sign_up',
  FORGOTTEN_PASSWORD: 'forgotten_password',
  MAGIC_LINK: 'magic_link',
  UPDATE_PASSWORD: 'update_password',
};
We'll need to keep track of the current view in our AuthProvider, so let's add it as view to the context as well:
export const AuthProvider = ({ supabase, ...props }) => {
  const [view, setView] = useState(VIEWS.SIGN_IN);
  // ...
  useEffect(() => {
    // ...
    const { data: authListener } = supabase.auth.onAuthStateChange(
      (event, currentSession) => {
        setSession(currentSession);
        setUser(currentSession?.user ?? null);

        switch (event) {
          case EVENTS.PASSWORD_RECOVERY:
            setView(VIEWS.UPDATE_PASSWORD);
            break;
          case EVENTS.SIGNED_OUT:
          case EVENTS.USER_UPDATED:
            setView(VIEWS.SIGN_IN);
            break;
          default:
        }
      },
    );
    // ...
  }, []);

  return (
    <AuthContext.Provider
      value={{
        session,
        user,
        view,
        signOut: () => supabase.auth.signOut(),
      }}
      {...props}
    />
  );
};
Here we're setting the view to UPDATE_PASSWORD when PASSWORD_RECOVERY event is dispatched, and to SIGN_IN when user logs out, or user is updated in session. Now all that's left is to pass this value to the Auth component. In our main page pages/index.js, update the following:
export default function Home() {
  const { user, view, signOut } = useAuth();
  // ...
  return (
    // ...
    {!user && <Auth view={view} supabaseClient={supabase} />}
    // ...
  );
}
Authentication Flows
With everything in place, we're now ready to try out the authentication flows. Make sure that you have the environment variables setup as outlined earlier, and then run the app with npm run dev and load localhost:3000.
Sign Up
First, let's register our user. On the landing page, click on "Sign up" link, which will take you to the Sign Up form.
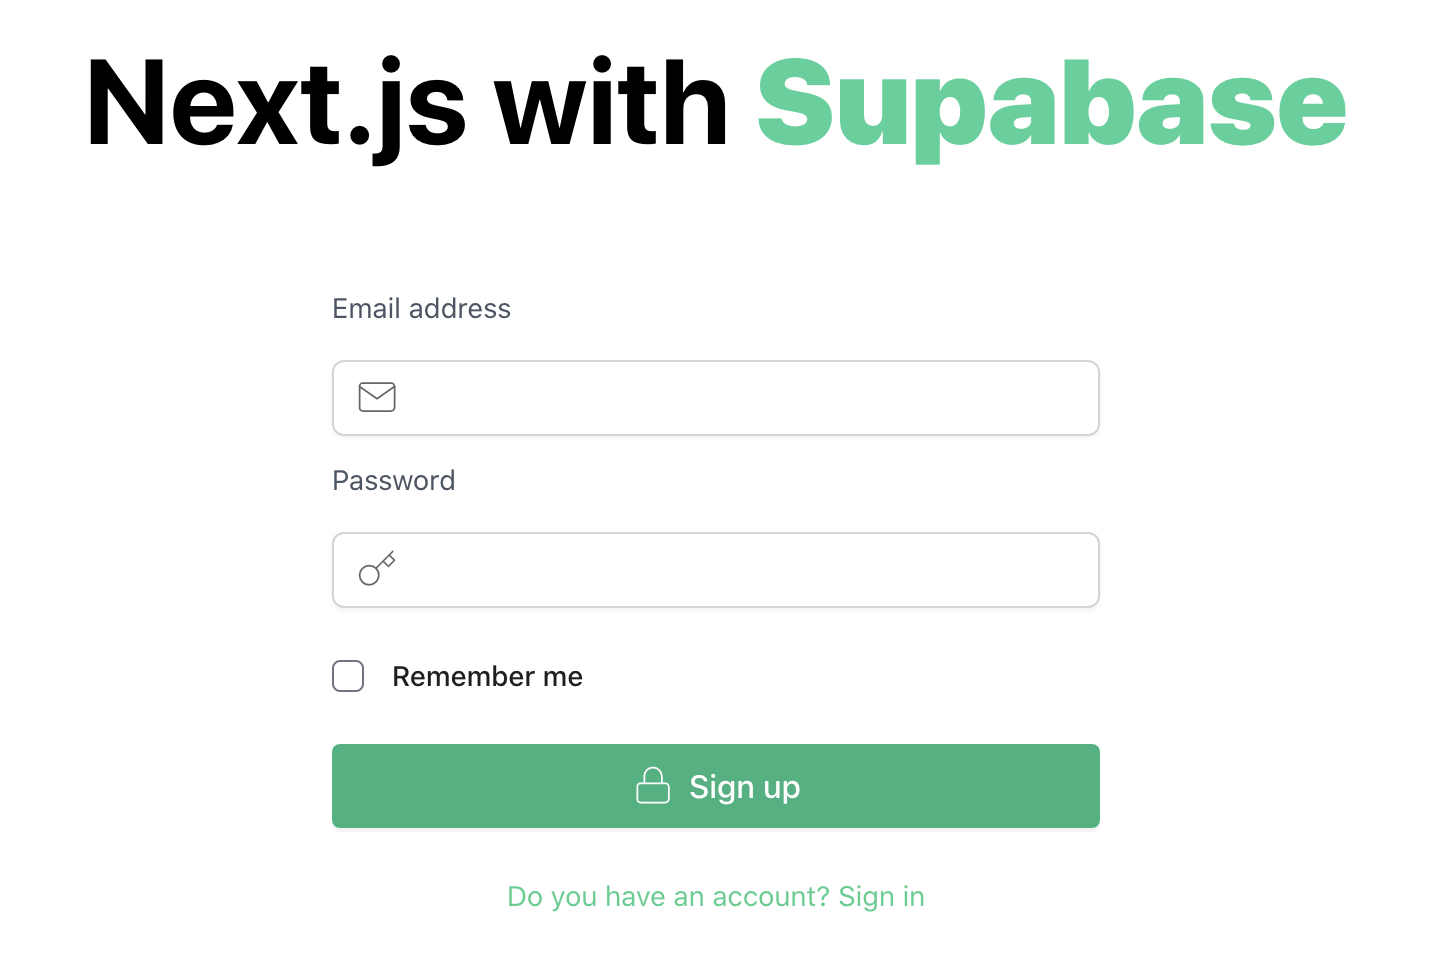 Sign Up
Enter your email and password, and press the "Sign up" button. This will send a confirmation email to the address provided, with a link to complete the registration process. It uses the default email template, which can be updated on the Templates page in Supabase Dashboard settings:
 Supabase Email Templates
Note as well that the default URL in the link is set to http://localhost:3000:
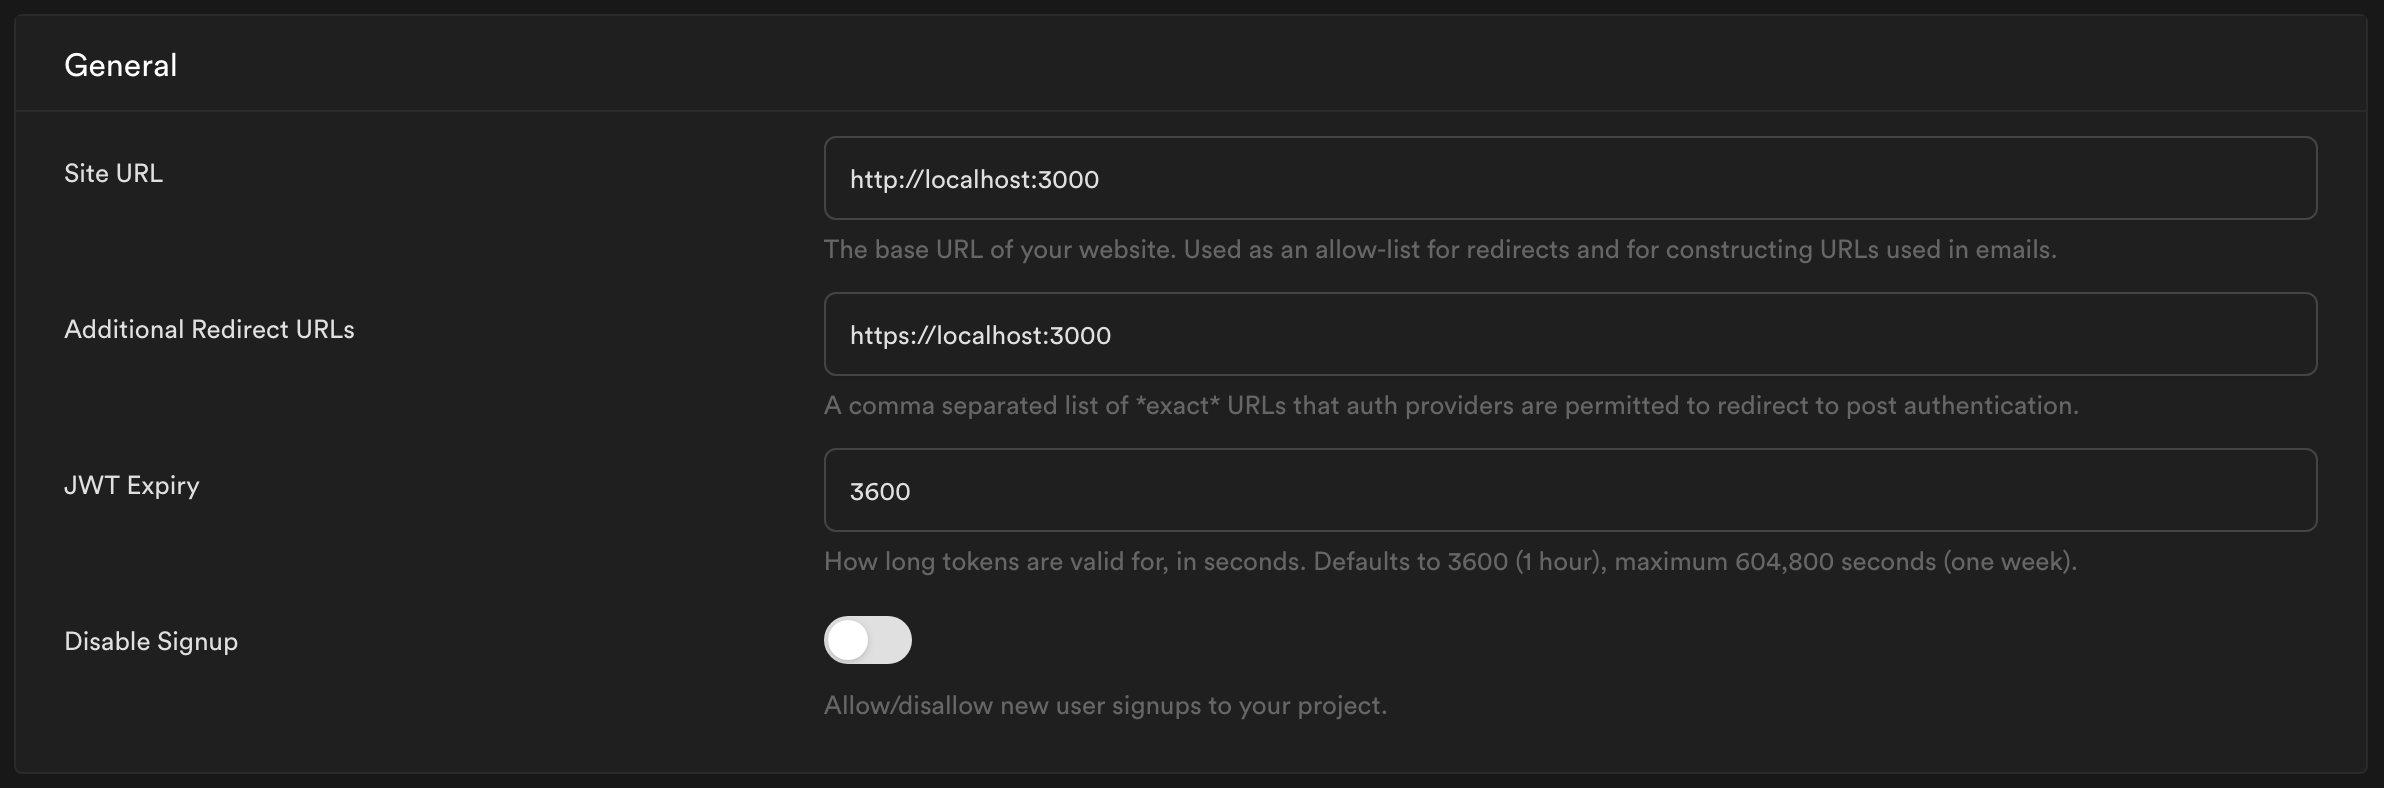 Supabase URL Settings
This works for development, but will need to be updated to the corresponding URL when running in production environments. See this GitHub discussion for more details.
Clicking the confirmation link will redirect you to the site URL (http://localhost:3000), along with an access_token and type, which is verified by the Supabase Client. It then sets the local session, and broadcasts the SIGNED_IN event.
Sign In
After a user signs in (either via Sign In form, or after clicking confirmation link, as above), Supabase Client sets the user session in localStorage under the supabase.auth.token key:
{
  currentSession: {
    provider_token: null,
    access_token: '<access_token>',
    expires_in: 3600,
    expires_at: 1635127600,
    refresh_token: '<refresh_token>',
    token_type: 'bearer',
    user: {
      id: '43cf36c1-9940-46e7-980a-fe1243b0e43c',
      aud: 'authenticated',
      role: 'authenticated',
      email: 'darth@empire.com',
      email_confirmed_at: '2021-10-25T01:06:38.040501Z',
      phone: '',
      confirmation_sent_at: '2021-10-25T01:06:09.418358Z',
      confirmed_at: '2021-10-25T01:06:38.040501Z',
      email_change_confirm_status: 0,
      last_sign_in_at: '2021-10-25T01:06:38.041156Z',
      app_metadata: { provider: 'email' },
      user_metadata: {},
      created_at: '2021-10-25T01:06:09.41273Z',
      updated_at: '2021-10-25T01:06:09.41273Z',
    },
  },
  expiresAt: 1635127600,
}
This also broadcasts the SIGNED_IN event, which gets picked up by our onAuthStateChanged listener we had setup earlier. The session, user and view are also updated as a result.
Sign Out
Signing out a user is as easy as calling the signOut function:
const { user, view, signOut } = useAuth();
// ...
<button type="button" className="button-inverse" onClick={signOut}>
  Sign Out
</button>;
This will remove the signed in user from the browser session, clear any associated items from localStorage, and fire the SIGNED_OUT event. Since our onAuthStateChange event handler is already setup, it will set the Auth view to SIGN_IN, so that our users are presented with the Sign In form again:
switch (event) {
  // ...
  case EVENTS.SIGNED_OUT:
  case EVENTS.USER_UPDATED:
    setView(VIEWS.SIGN_IN);
    break;
  // ...
}
The Auth component will detect this change, and render the sign-in form.
Reset Password
If a user had forgotten their password, they can request a password reset. From the sign in screen, click on "Forgot your password?" and enter the email used to register:
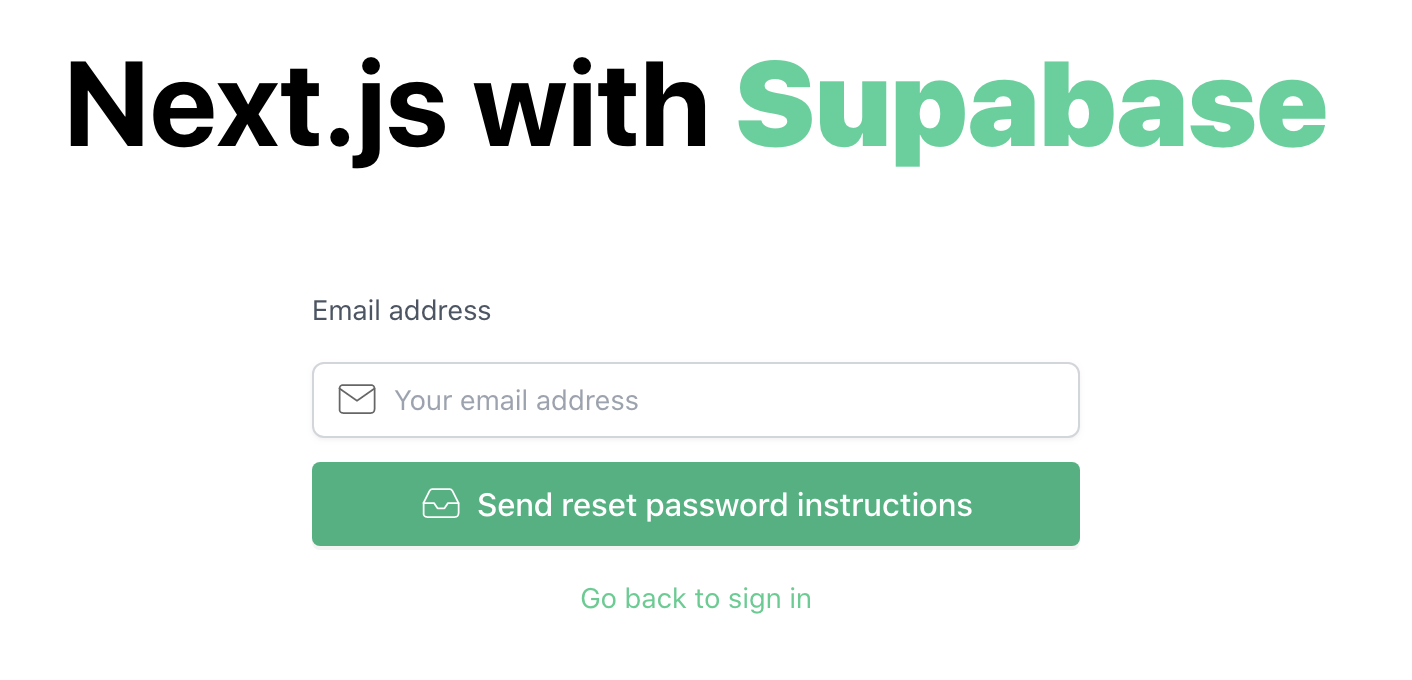 Reset Password
After submitting the form, Supabase will send a password reset email with a link. Remember that you can update this email template via Supabase Dashboard as well if you'd like.
When a user clicks the link in the email, they'll be redirected to:
<SITE_URL>#access_token=x&refresh_token=y&expires_in=z&token_type=bearer&type=recoverywhere type=recovery indicates that this is a Reset Password flow. Normally, our app would need to detect this and present the user with a password reset form. However, since we are using Supabase Client and Supabase UI, all of that is made much easier.
Earlier we had setup the onAuthStateChange listener to wait for specific auth events and update the view accordingly. When the above request comes in, Supabase Client dispatches the PASSWORD_RECOVERY event, which sets the view to update_password. We're not quite done, however.
You see, as part of the reset password flow in GoTrue, user is temporarily logged in with the verification token, before actually updating the password. This is by design, however it means that we need to add some additional checks for this in our app.
Since we're relying on user to determine whether to show the auth forms, we need to check for the UPDATE_PASSWORD view explicitly, and render the corresponding form then. Luckily for us, Auth from Supabase UI also exports the UpdatePassword component, which we can use on its own.
Add this conditional to check for the view on the Home page:
export default function Home() {
  const { user, view, signOut } = useAuth();

  if (view === VIEWS.UPDATE_PASSWORD) {
    return (
      <Layout>
        <Auth.UpdatePassword supabaseClient={supabase} />
      </Layout>
    );
  }
  // ...
}
Now when a user clicks on the link, they'll be presented with this screen:
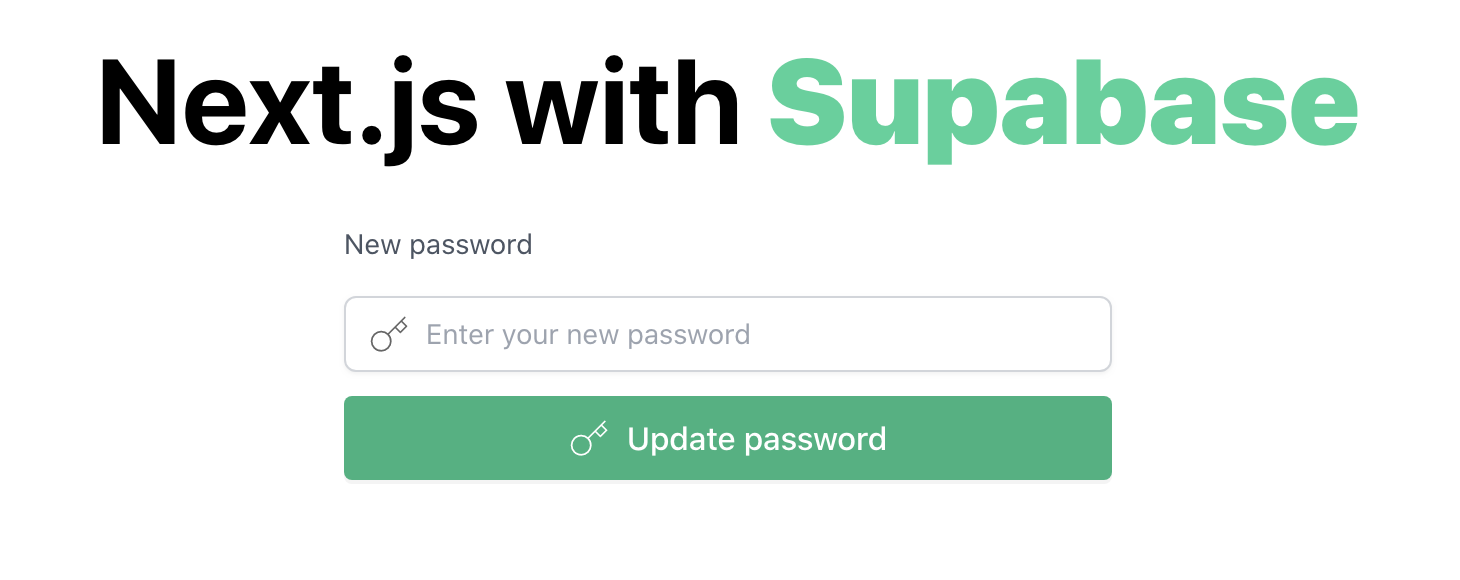 Update Password
Behind the scenes, when a user submits the new password, Supabase UI will call the update method in Supabase Client, which updates the user on the backend and sets the new password. If successful, Supabase Client then dispatches the USER_UPDATED event, which (once again) gets picked up by onAuthStateChange listener, and updates our user and session data.
Go ahead and give that a try. You should now see the logged-in state of the app.
Server-Side Rendering (SSR)
All of the above examples are doing authentication on the client-side. Let's also take a look at how do this on the server, using Next.js API routes and server-side rendered pages.
This will allow us to do protected routes to limit access only to authenticated users, and redirect otherwise. It will also help eliminate a flash of unauthenticated state on initial page load, which can happen with the client-side only approach.
Let's add this to the existing Profile page.
First, we need to create a new API route. Create a new auth.js file in the pages/api folder:
import { supabase } from '@/lib/client';

export default function handler(req, res) {
  supabase.auth.api.setAuthCookie(req, res);
}
Calling the setAuthCookie method will set the current session in a cookie, allowing us to persist it to the server.
Next, we need to ensure that whenver authentication state changes, that change gets propagated down (via the above API). To do this, update AuthProvider in lib/auth.js to call the /api/auth API with the current session in the onAuthStateChange handler:
export const AuthProvider = ({ supabase, ...props }) => {
  // ...
  useEffect(() => {
    // ...
    const { data: authListener } = supabase.auth.onAuthStateChange(
      (event, currentSession) => {
        // ...
        fetch('/api/auth', {
          method: 'POST',
          headers: new Headers({ 'Content-Type': 'application/json' }),
          credentials: 'same-origin',
          body: JSON.stringify({ event, session: currentSession }),
        }).then((res) => res.json());
      },
    );
    // ...
  }, []);
  // ...
};
We also need to enable server-side rendering on the Profile page, and check for user prior to rendering the page on the client. To do this, we'll need to get the user from the cookie above. If no valid session exists, we can redirect user back to the Sign In form.
In pages/profile.js, add getServerSideProps and call the getUserByCookie method from Supabase Client:
export default function Profile({ user }) {
  // ...
}

export async function getServerSideProps({ req, res }) {
  const { user } = await supabase.auth.api.getUserByCookie(req);

  if (!user) {
    console.log('Please login.');
    return { props: {}, redirect: { destination: '/', permanent: false } };
  }

  return { props: { user } };
}
If there is a valid logged-in user in the session stored in the cookie, we can use it to protect our pages in Next.js. If user exists, pass it as a prop to our client-side. Otherwise, we can redirect users back to Home page by setting the redirect to /. This way we can ensure that Profile is only accessible to logged-in users.
Next, let's update the Profile page to display some of the user data. Update pages/profile.js to display the user id and the last_sign_in_at date:
export default function Profile({ user }) {
  return (
    <Layout>
      <h3 className="py-8 text-4xl font-black">{user.id}</h3>
      <p className="my-4 text-lg">
        Last Signed In:
        <code className="highlight">
          {new Date(user.last_sign_in_at).toLocaleString()}
        </code>
      </p>
      <div className="inline-flex flex-col">
        <Link href="/">
          <a className="button mt-8">Go Home</a>
        </Link>
      </div>
    </Layout>
  );
}
Theming
While the default styling of Supabase UI is a good start, more than likely you will want it to match the rest of your app's look and feel. Unfortunately, as of the writing of this article (@supabase/ui version 0.36.0), theming support is not available just yet (though it is coming).
But don't fret! It's quite easy to work around this limitation in the meantime. We can set styling of UI elements in Supabase UI by targeting their CSS classes, and extend them in our src/styles/globals.css file with Tailwind, and our existing custom classes:
.sbui-input {
  @apply custom-focus rounded-full focus:shadow-none !important;
}

.sbui-checkbox {
  @apply custom-focus rounded-full focus:shadow-none !important;
}

.sbui-btn-primary {
  @apply custom-focus button-inverse rounded-full !important;
}

.sbui-typography-link {
  @apply custom-focus rounded-full font-bold text-green-400 !important;
}
Note the use of
!importanthere, as we need these styles to be the top-most specificity.
This will ensure that the input fields, buttons and text links in the Auth component us the same styling as the rest of our application. We're also making it a bit more accessible by adding more pronounced focus and hover outlines.
 Sign In form improvements
Now our authentication forms match as well! 🎉 Play around with it and change more as you see fit. Though not the ideal solution, it still beats setting everything up from scratch, and I'm confident that the folks over at Supabase will have this capability delivered in the near future.
You may want to keep an eye on their GitHub repo as well for future updates.
Wrap Up
And this about wraps it up. If you've followed along this far, by now you should have a fully working authentication layer in your app, with all of the required forms and flows hooked in, and a pretty decent-looking UI to go along with it.
All of the code in this article is available for reference in GitHub. Live version is available as well:
If you'd like to learn more about Supabase and Supabase UI, make sure to check out the official docs: